


Table of Contents
- How to Hang Aluminum Signs Without Damaging Walls: Your Complete Guide
- What You'll Need Before You Start
- Best Adhesive for Metal Signs: Choosing the Right Method
- Mounting Metal Signs on Drywall: Step-by-Step Instructions
- How to Hang Signs on Brick Without Drilling
- Using Standoff Hardware for Professional Installation
- Renter-Friendly Mounting Solutions
- Weight Considerations and Load-Bearing Capacity
Last Updated: August 4, 2026
How to Hang Aluminum Signs Without Damaging Walls: Your Complete Guide
Learning how to hang aluminum signs without damaging walls is essential for preserving your surfaces while displaying eye-catching décor. Whether you're decorating a man cave, garage, or living space, the right mounting technique ensures a professional-looking installation without costly repairs. At Real Cool Signs, we've helped thousands of customers hang aluminum signs safely. Below, we'll show you exactly how to hang aluminum signs without damaging walls using proven methods that protect your surfaces while keeping your signage secure.
The challenge most people face is figuring out how to install a sign without leaving holes, dents, or sticky residue behind. Many renters face this dilemma, and even homeowners want to avoid unnecessary wall damage. The good news: you have multiple options, from adhesive strips to standoff hardware, each suited to different wall types and sign weights.
What You'll Need Before You Start
Before hanging your aluminum sign, gather the right tools and materials.
Essential items:
- Your aluminum sign (with weight noted)
- Isopropyl alcohol (90% or higher) for surface cleaning
- Lint-free cloth or paper towels
- Level (a 2-foot level works well for most signs)
- Measuring tape
- Pencil for marking placement
For adhesive-based mounting:
- Double-sided mounting tape or VHB tape
- Small roller or squeegee tool (optional)
For hardware-based mounting:
- Standoff hardware, drywall anchors, or brick anchors
- Drill or screwdriver
- Appropriate fasteners for your wall type
For temporary installations:
- Removable adhesive strips rated for your sign's weight
- Easel back stands (if displaying on tabletops)
Clean surfaces are the foundation of any strong bond. Skipping this step leads to adhesive failure and peeling tape.
Best Adhesive for Metal Signs: Choosing the Right Method
Selecting the right adhesive depends on your sign's weight, wall type, and whether you need a permanent or temporary installation.
Adhesive Strips and Double-Sided Mounting Tape
Adhesive strips and double-sided mounting tape are the simplest, non-invasive options for lightweight aluminum signs under 5 pounds on smooth surfaces like drywall or painted walls. Standard double-sided tape is affordable and easy to apply but works best in climate-controlled indoor environments. It loses adhesive strength in heat, humidity, and direct sunlight. For outdoor mounting or exposed conditions, standard tape may fail within months.
For signs weighing 3-5 pounds on drywall, adhesive strips are reliable. Removal is straightforward: gently pull the sign away from the wall at a shallow angle, then use isopropyl alcohol to dissolve any remaining residue.
VHB Tape vs. Standard Adhesive
VHB (Very High Bond) tape outperforms standard double-sided tape in nearly every category. VHB tape uses acrylic foam technology that creates stronger bonds and resists temperature fluctuations better than traditional tape. It's suitable for signs up to 10 pounds on ideal surfaces and performs better in outdoor conditions.
VHB tape requires thorough cleaning with isopropyl alcohol and benefits from a 24-hour curing period before applying weight. Removal can be trickier because of its stronger bond. Gentle heat from a hair dryer on low setting can soften the adhesive, making removal easier without damaging paint.
3M's technical documentation on VHB tape performance shows that VHB tape maintains 90% of its bond strength over five years when properly applied, compared to standard tape's 60-70% retention rate.
Mounting Metal Signs on Drywall: Step-by-Step Instructions
Drywall is the most common wall surface in homes. The key is understanding drywall's limitations: it's softer than brick or concrete, so weight distribution matters more.
Surface Preparation for Maximum Adhesion
Surface preparation determines whether your sign stays secure or falls within days. Start by wiping away any dust, cobwebs, or debris on your wall with a dry cloth. Next, clean the surface with isopropyl alcohol on a lint-free cloth, wiping in circular motions over an area slightly larger than your sign. Let the surface dry completely, at least 2-3 minutes, before applying any tape.
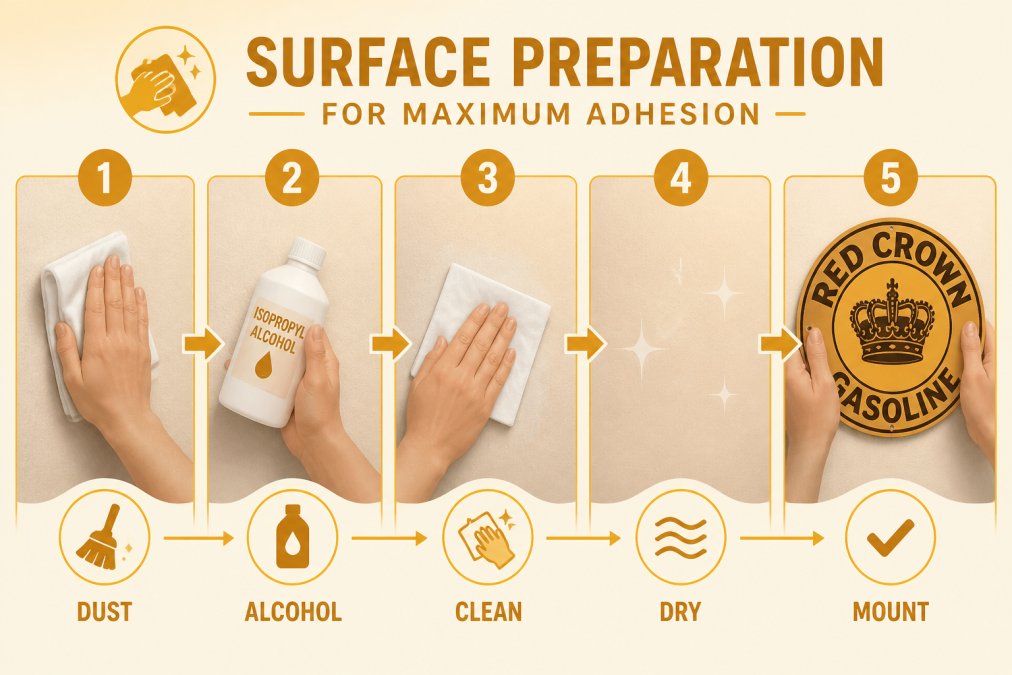
For painted drywall with a glossy finish, lightly sand the mounting area with fine-grit sandpaper (220-grit or higher) to create texture. Temperature matters too. Adhesives bond best at room temperature (65-75°F).
Application Process and Curing Time
Once your surface is clean and dry, you're ready to apply adhesive. For double-sided mounting tape, cut pieces to fit the back corners and center of your sign. Use 3-4 pieces positioned to distribute weight evenly. Press each piece firmly onto the sign back, then carefully position the sign on the wall. Start at the top edge and slowly lower it into position to prevent air bubbles. Once positioned correctly, press firmly across the entire back surface for 30 seconds.
VHB tape follows the same process but demands patience. After pressing the sign into place, wait 24 hours before adding any weight or adjusting the sign. Check your sign's level immediately after hanging to ensure weight distributes evenly.
How to Hang Signs on Brick Without Drilling
Brick presents unique challenges for sign mounting because traditional adhesives don't bond well to porous, textured surfaces. For lighter signs (under 3 pounds) on brick, adhesive strips can work if you prepare the surface carefully. Clean the brick thoroughly with isopropyl alcohol to remove dust from the porous surface.
For heavier signs or permanent installations, standoff hardware is the most reliable method. Brick anchors designed for this purpose grip the brick without requiring through-holes. These anchors expand slightly when tightened, creating mechanical hold rather than relying on adhesive alone.
Brick's durability means you can use more aggressive mounting methods without worry. Drilling into brick is straightforward with the right drill bit (masonry bit), and the holes won't expand or weaken over time like drywall anchors can.
Using Standoff Hardware for Professional Installation
Standoff hardware delivers the most secure, professional-looking installation for aluminum signs. These fasteners hold signs away from the wall surface, creating a floating effect that looks polished and intentional. Standoffs work on drywall, brick, metal, and concrete.
Standoffs consist of two parts: a wall-mounted post and a sign-mounted receiver. The gap between wall and sign allows light to pass behind, creating visual depth and a premium appearance. This gap also allows air circulation, which helps prevent moisture buildup behind the sign.
Installation requires drilling pilot holes and fastening the posts to the wall. For drywall, use drywall anchors rated for your sign's weight. For brick and concrete, use masonry anchors or expansion bolts. For metal surfaces, use fasteners designed for sheet metal.
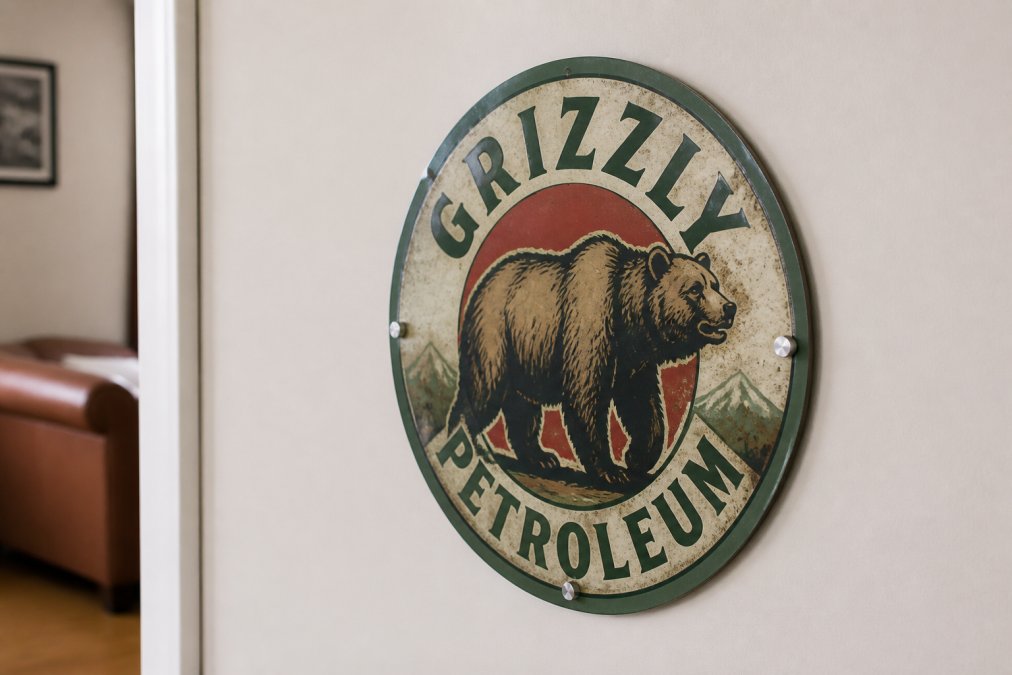
Signs mounted with standoffs rarely fail and are as permanent as wall-mounted fixtures. Stainless steel standoffs resist rust and corrosion, making them suitable for outdoor use or humid environments. Brass standoffs offer a decorative option that complements vintage or industrial signs. Aluminum standoffs are lightweight and blend seamlessly with aluminum signs.
Spacing standoffs correctly is crucial for weight distribution. For signs up to 15 pounds, four standoffs (one in each corner) provide adequate support. Larger or heavier signs may need additional standoffs spaced evenly across the back.
Renter-Friendly Mounting Solutions
Renters face unique constraints: mounting methods must be removable without damaging walls or losing security deposits. Modern adhesive technology and hardware options make renter-friendly installations both secure and damage-free.
Removable adhesive strips are the renter's best friend. Products specifically designed for renters use weaker adhesive that bonds securely but releases cleanly without leaving marks. These strips work for signs up to 5 pounds on smooth, clean surfaces. The key to renter-friendly mounting is testing removal before you move out. Hang your sign, let it cure fully (24 hours for most adhesives), then test removal on a small corner.
Easel Backs and Tabletop Display Options
Easel backs offer the ultimate renter-friendly solution: no wall mounting required. These stands hold signs upright on shelves, dressers, nightstands, or desks. Aluminum signs with easel backs combine the visual impact of wall-mounted signs with the flexibility of tabletop displays.
Easel backs come in various heights and materials. Aluminum easel backs match aluminum signs aesthetically and support heavier signs without tipping. Tabletop display offers several advantages for renters: you can rearrange your space without leaving holes, move signs between rooms in seconds, and remove décor quickly for rental inspections. The downside is that tabletop displays consume floor or shelf space, which matters in smaller apartments.
Temporary Installation Methods
Temporary installation methods prioritize removability without sacrificing security during display. Removable adhesive strips, magnetic mounts (for metal surfaces), and suction cups (for glass) all fall into this category.
Removable adhesive strips are specifically formulated to release cleanly after months or years of holding weight. Read packaging carefully to ensure you're buying removable strips, not permanent ones. Magnetic mounting works only on metal surfaces like metal studs or metal accent walls. Suction cups work on smooth glass surfaces like windows or glass shower doors and are ideal for bathroom signs or window displays.
Weight Considerations and Load-Bearing Capacity
Understanding your sign's weight and your wall's load-bearing capacity is the foundation of safe installation. Exceeding a wall's capacity leads to failure.
Aluminum signs vary dramatically in weight depending on size and thickness. A 12-inch aluminum sign typically weighs 2-4 pounds. A 24-inch sign weighs 8-12 pounds. Very large signs or thick-gauge aluminum can weigh 20+ pounds. Always check your specific sign's weight before choosing a mounting method.
Wall type determines load-bearing capacity. Drywall alone supports minimal weight, typically 5-10 pounds with proper adhesive and perfect surface preparation. Drywall anchors increase capacity to 20-50 pounds depending on anchor quality. Brick and concrete support much heavier loads, 100+ pounds with appropriate fasteners.
The relationship between sign weight and adhesive choice is direct. A 3-pound sign can hang safely on standard double-sided tape. A 10-pound sign requires VHB tape or hardware mounting. A 20-pound sign demands standoff hardware or masonry anchors.
Humidity and temperature affect adhesive performance significantly. In humid environments, adhesives weaken over time. In hot climates, some adhesives soften and lose grip. In cold climates, adhesives become brittle. Account for these factors when choosing mounting methods for outdoor signs or signs in extreme environments.
Consider weight distribution across mounting points. A sign with four adhesive strips distributes weight across four contact points. A sign with two adhesive strips concentrates weight on two points, increasing stress. More mounting points equal safer, more reliable installations.
| Sign Weight | Best Mounting Method | Wall Type | Durability |
|---|---|---|---|
| Under 3 lbs | Adhesive strips | Drywall | 6-12 months |
| 3-8 lbs | VHB tape or light hardware | Drywall | 1-3 years |
| 8-15 lbs | Standoff hardware | Drywall/Brick | 5+ years |
| 15+ lbs | Heavy-duty standoffs or anchors | Brick/Concrete | Permanent |
Test your installation before trusting it with a valuable sign. Hang a lightweight test sign using your chosen method, then gently tug on it after curing. The sign should not move. If it shifts or flexes, the mounting method isn't adequate for your wall type or environment.
Real Cool Signs' vintage aluminum signs, like the Sinclair Dino Gasoline 1951 Round Sign and Vintage Valvoline Motor Oil Round Sign, are designed for durability and typically weigh 3-5 pounds. These weights work well with adhesive mounting on properly prepared drywall, though standoff hardware is recommended for permanent installations or outdoor display. For heavier pieces like the Vintage Texaco Gasoline & Motor Oil Round Sign, standoff hardware ensures long-term security and professional appearance.


Ready to make your space stand out? Explore unique, conversation-starting signs at RealCoolSigns.com and find the perfect piece for your home, office, garage, or gift.
Frequently Asked Questions
What's the best way to hang an aluminum sign without drilling holes?
Adhesive strips and double-sided mounting tape are your strongest non-drilling options. For signs under 5 pounds, VHB tape or heavy-duty adhesive strips work well on clean, dry drywall. For heavier aluminum signage, standoff hardware with pre-drilled holes in the sign itself eliminates wall damage since the fasteners go into the sign frame, not the wall surface. Always clean your wall with isopropyl alcohol first to maximize adhesive strength and shear resistance.
Can I use Command strips or adhesive strips on aluminum signs?
Yes, but only for lightweight aluminum signs. Standard Command strips support up to 5 pounds, while heavy-duty adhesive strips may handle 10-15 pounds depending on the product. Aluminum signage heavier than this requires standoff hardware or mechanical fasteners. The key is matching the adhesive's peel strength and shear strength to your sign's weight. Test the adhesive on a small area first, and allow full curing time, typically 24-48 hours, before hanging your sign.
How do I hang metal signs on brick without drilling?
Brick presents challenges for adhesive-only mounting because its porous, uneven surface reduces adhesive contact. Your best options are masonry adhesive strips designed for brick, or standoff hardware with masonry anchors that mount into pre-drilled holes. If using adhesive, clean the brick with isopropyl alcohol and allow extra curing time. For a permanent, damage-free solution, standoff hardware distributes weight better than adhesive alone and won't leave residue when removed.
What adhesive works best for mounting aluminum signs to drywall?
VHB tape and heavy-duty double-sided mounting tape are the top choices for drywall. VHB offers superior shear and peel strength, making it ideal for signs up to 15 pounds. Standard double-sided tape works for lighter signs under 5 pounds. Always prepare the drywall surface by cleaning with isopropyl alcohol to remove dust and oils, which improves adhesive bonding. Allow 24-48 hours of curing time before placing weight on the sign, and avoid hanging in areas subject to temperature swings or high humidity that can weaken adhesive over time.
How do I remove adhesive from my wall without causing damage?
Start by gently peeling the sign away at a low angle, working slowly to avoid tearing drywall. For stubborn adhesive residue, apply heat with a hair dryer for 30 seconds to soften the adhesive, then peel again. If residue remains, use rubbing alcohol or adhesive remover on a soft cloth, rubbing gently in circular motions. Avoid scraping with hard tools, which can gouge drywall. Test any chemical remover on an inconspicuous area first. Most adhesive residue comes off cleanly if you allow adequate removal time and use gentle pressure.
Ready to make your space stand out? Explore unique, conversation-starting signs at RealCoolSigns.com and find the perfect piece for your home, office, garage, or gift.